
Contact Form 7 is a great form generator for WordPress. It has a simple set of features and is lightweight allowing for quick form generation and easy deployment. But, sometimes it just doesn’t quite fit the requirements of the form. Recently we needed to make a form where the message would be delivered to different people based on a form selection. This guide will walk you through how we accomplished the requirement.
After Contact Form 7 has been installed, and your basic form has been outlined we can determine how we want to guide our visitor into selecting the recipient of the form submission.
We want to add in a Drop Down Menu to our form. This is where we will house the selections. In this example, we are going to use a Golf Course with an event space and a restaurant as well as general golf inquiries.
- In your Contact Form 7 Editor choose “drop-down menu”
- You will be presented with the “Drop-down Menu” editor window
- We want this field to be required so that our mail gets sent to the right person so be sure to check that box.
- The name field is the merge tag. For this example, we will use “Recipient”
- In the “options” field is where we will specify our recipients.
- The syntax is:
LABEL|email@address.com - Enter all of your options into the options field.
- In this example, we won’t be allowing multiple selections as it is not required.
- If you need to, specify your Id attribute or Class attribute.
- Once finished hit “Insert Tag”

Step 1

Steps 3-10

Step 2
Once you have finished the steps above and added a label to your drop-down menu follow the steps below.
- Navigate to the “Mail” Tab of your form
- In the “To:” field is where we will specify who the mail is going to. We need this to pull from our drop-down menu selection from the previous section. In our example we named our field “recipient” so our entry into the “To:” field will be
[recipient] - In the “Subject” field we like to see what our email is about before we read it. Let’s grab the selection from the drop-down menu like before but this time we want to use the text before the ” | “. You can add in any text you want here but, a common example would be “Website Inquiry:
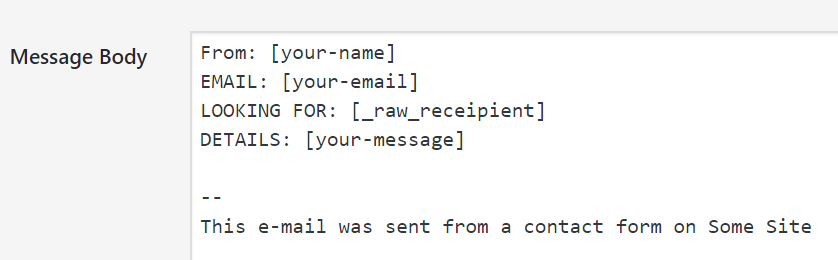
"[_raw_receipient]"This will pull in the data before the ” | ” and display it as text in your subject line. - The last section you might want to modify is the body field. Just like the “Subject” field, we will want to include the raw content from the drop-down menu. You can see how we laid out our body field in the image on the right.

Step 1

Step 2

Step 3
Step 4
This guide gives you a method to have the user unknowingly select who their contact request is going to be received by. We used Contact Form 7, a popular WordPress Plugin, to accomplish our goal. We hope that this guide makes your WordPress development a success. If you or someone you know needs help with a WordPress website please contact 45Squared anytime!

Share This Guide, Choose Your Platform!
Connect with 45Squared
Tired of unreliable hosting? Learn about 45Squared’s fully managed AWS hosting →